Install Plover2CAT
If you already know how to install plugins on the command line, skip this tutorial.
This tutorial covers how to install Plover2CAT, a Plover plugin for computer-aided transcription (CAT) on the Windows operating system.
You will need to have installed Plover already (see install tutorial).
Find the Plover directory
To install, you need to first find where the Plover plugin is located on the computer. It may be in Program Files > Open Steno Project or another place on the computer.
One way of finding the location is through the start menu (if you selected installing shortcuts). Search for Plover.

Click the arrow next to Plover, there will be choices for Open, Run as Administrator and Open File Location.
Click Open File Location and the file explorer will open with the Plover shortcuts.
Click on Properties with the shortcut selected, and a window will popup. Alternatively, right-click on the shortcut and select Open File Location.

Then click the Open File Location button for the Plover directory to open.
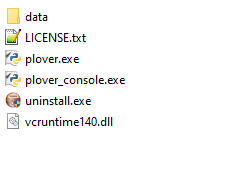
The folder will contain plover.exe, uninstall.exe and plover_console.exe among other files.
Open Command Prompt
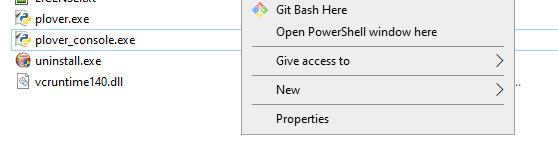
To open command prompt, hold the Shift key and then right-click. On the menu, click Open Powershell Window.
At this point, close Plover if it is running. Make sure to exit Plover completely by Quit, rather than Plover just being minimized to the tray.
Use this command
To install Plover2CAT, copy the line below, and paste it into the powershell window.
.\plover_console.exe -s plover_plugins install git+https://github.com/greenwyrt/plover2CAT.git

Then press enter. Plover may take some time to install and there will be text appearing notifying what is being done.
At the end, the last line of the messages should be something like Successfully installed plover2cat-version.
Check Installation
Open up Plover. Plover2CAT should appear if you view the Tools menu.

Click Plover2CAT and a new window should appear.
